
A detailed look at how we planned, sourced, and installed custom DIY drip irrigation in our raised beds
We chose custom DIY drip irrigation for our raised beds for many reasons, but the main reason was that it was so easy and affordable! Read on to learn from our experiences and see detailed information about our planning, sourcing, and installation adventures.
We ultimately chose to buy this DIY drip irrigation kit from the Drip Depot both because they had everything bundled for us online and then allowed us to customize the bundle for our unique setup.
Importance of efficient watering in raised beds
When it comes to gardening in our region, efficient watering is crucial for the health and productivity, and sustainability of anything you plant. Unlike traditional garden beds, raised beds have limited space and soil volume. This means that every drop of water you provide needs to be utilized effectively.
Efficient watering ensures that your plants receive the right amount of moisture while minimizing wastage. By watering efficiently, you can prevent water runoff, evaporation, and uneven distribution.

This is particularly important in regions with limited water resources or during dry spells when water conservation becomes paramount. Moreover, efficiently watering your raised beds helps create a favorable environment for root growth and reduces the risk of overwatering or underwatering your plants.
Benefits of drip irrigation over traditional watering methods
Drip irrigation has emerged as a game-changer for gardeners and farmers alike due to its numerous benefits over traditional methods such as hand-watering or sprinkler systems. One key advantage is precision: drip irrigation delivers water directly to the plant’s root zone with minimal loss due to evaporation or runoff. This targeted approach ensures that each plant receives optimal hydration without wasting any water.
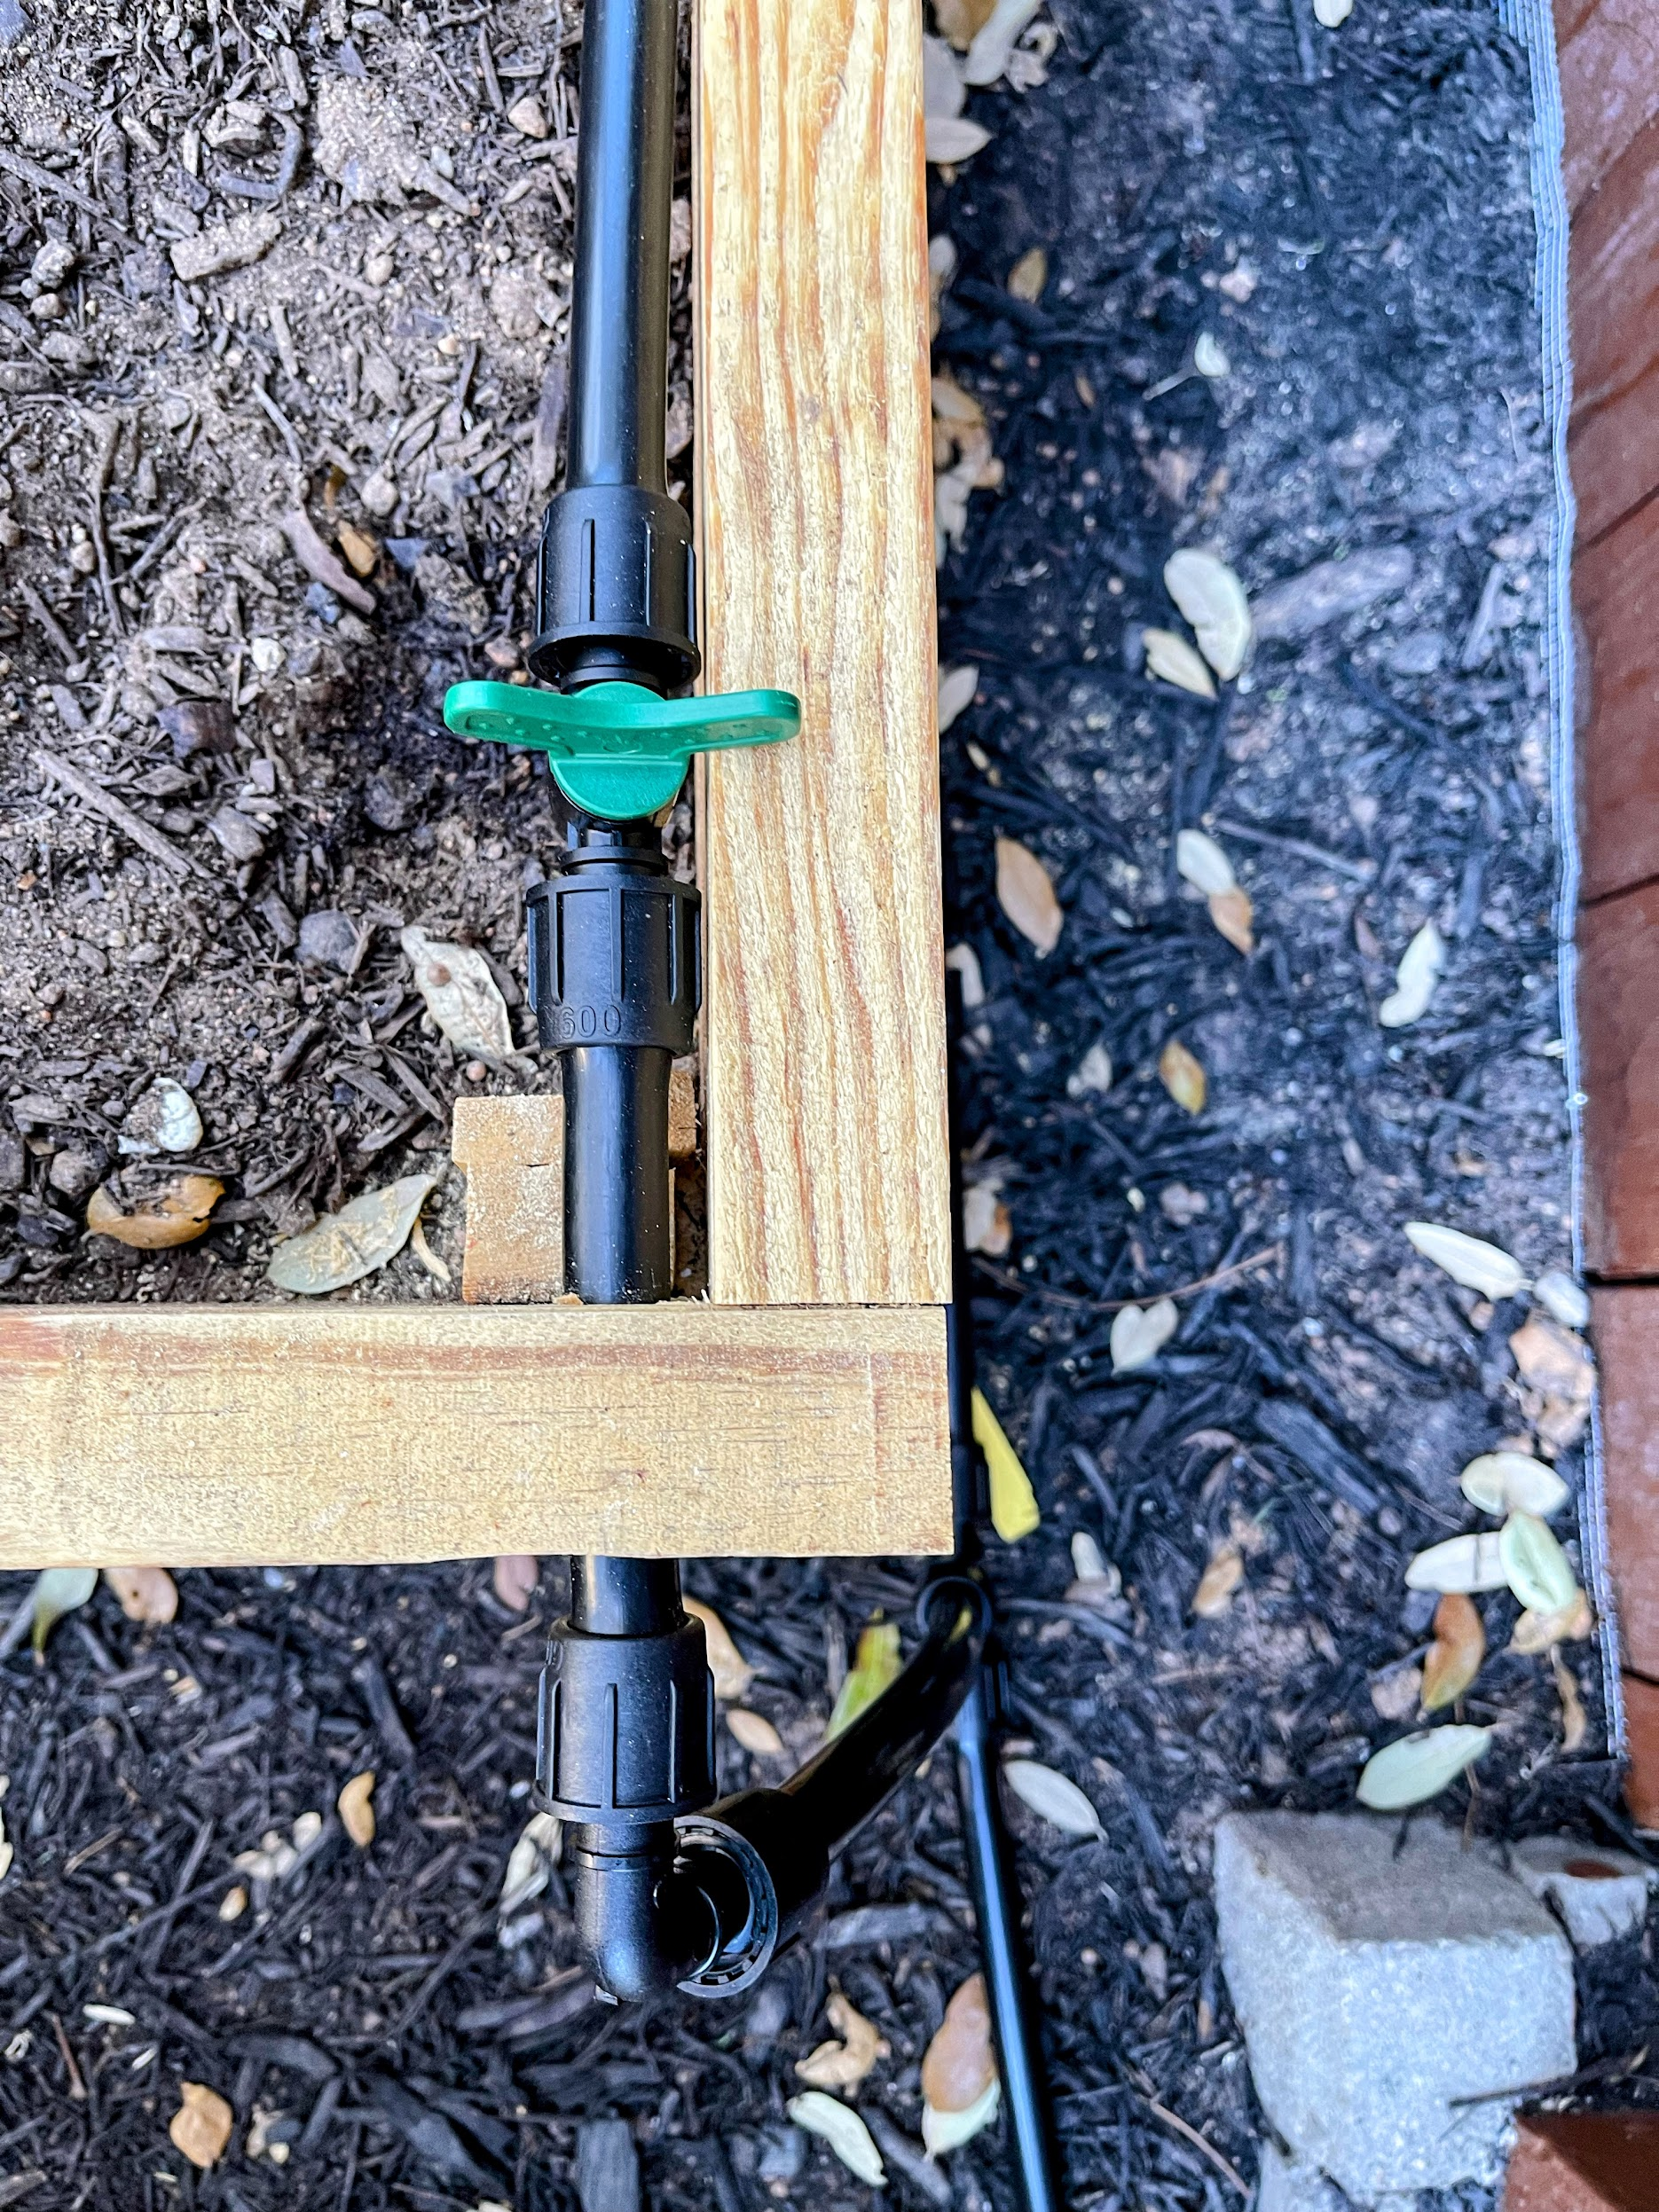
In Central Texas it is particularly useful to put shutoff valves at each bed so that in the miserable heat of summer you can choose to turn off entire beds or sections of beds! This saved us a ton of money.
Another advantage of drip irrigation is its flexibility in accommodating different plant needs within a single raised bed. With adjustable emitters and tubing layout customization, you can easily tailor the irrigation system to match individual plants’ requirements for moisture levels.

Additionally, drip irrigation conserves water by reducing weed growth since it only waters the intended plants rather than spraying water over a wide area like sprinklers do. Furthermore, drip irrigation helps minimize diseases caused by excess moisture on plant foliage by keeping leaves dry during watering sessions, which traditional methods often struggle with.
Maintaining proper soil moisture levels without creating excessive humidity around the plants’ leaves can safeguard them from fungal infections that thrive under damp conditions. Efficient watering is essential for raised beds due to their limited space and soil volume.
DIY drip irrigation offers several advantages over traditional watering methods, including precision, flexibility in customization, water conservation, and disease prevention. Implementing a drip irrigation system in your raised beds will ensure healthier plants and foster sustainable gardening practices.
Understanding the Basics of Drip Irrigation
Components of a Drip Irrigation System
Drip irrigation may sound fancy, but it’s actually a simple and efficient way to water your raised beds. To get started, you need to familiarize yourself with the key components of a drip irrigation system. Let’s break it down, shall we?
First up, we have the main water supply line. This is where all the magic happens.
It connects to your outdoor faucet or water source and serves as the lifeline for your plants. You’ll want to choose a sturdy pipe that can handle the water pressure and won’t easily crack or break.
This is our initial custom DIY drip irrigation setup at the spigot. When I get to Phase 2 of this system, I will be connecting it to a rainwater system instead of city water, but for now, this works great for our needs. A wish list item to upgrade this approach is this Garden Hose Inline Water Filter that will some of the chlorine and fluoride from our city water.

Next in line is the pressure regulator and filter. These two buddies work together to ensure smooth sailing for your drip irrigation system.
The pressure regulator keeps things in check by reducing high water pressure that could damage your emitters or tubing. Meanwhile, the filter catches any debris or sediment that might clog up your system and cause headaches down the line.
Last but certainly not least, we have distribution tubing and emitters. The distribution tubing brings water from the main supply line to each bed, delivering it right where your plants need it most.
Emitters are like tiny superheroes that control how much water is released into each plant’s root zone. They come in various shapes and sizes – from drippers to micro-sprayers – so you can customize watering according to different plant needs.
Calculating Water Requirements for Raised Beds
Now that we’ve covered the components of a drip irrigation system let’s dive into calculating how much water your raised beds actually need. Different plants have different thirst levels (just like humans).
But fear not! You can use a simple formula to determine their hydration needs: area x depth x application rate.
First off, measure the total area of each raised bed. Multiply the length by the width to get the square footage.
For example, if your bed is 4 feet wide and 6 feet long, you’ll have a total area of 24 square feet. Next, consider how deep you want the water to penetrate into the soil.
This will depend on factors such as soil type and plant root depth. Let’s say you want the water to go 6 inches deep.
Determine the application rate – how much water your emitters release per hour. This information can usually be found on the packaging or manufacturer’s website.
With these numbers in hand, you can now calculate how much water your raised beds require. Multiply the area by the depth and divide by the application rate.
For instance, if your calculation results in 3 gallons per hour, that means you need a drip irrigation system with an application rate of approximately 3 gallons per hour. By understanding these basics and doing some calculations upfront, you’ll be well-prepared to install a drip irrigation system that ensures your raised beds receive just the right amount of water they need – no more soggy plants or thirsty greens!
Planning the Layout for Drip Irrigation System in Raised Beds
Measuring the dimensions and spacing of raised beds
We started our custom DIY drip irrigation journey by doing a ton of measurements. Measuring the dimensions of each bed, the distance the water needed to travel around our back deck to reach the raised beds, and the number of connectors was useful — but at the time of actual installation, there was a lot of measuring in place and buying a few more of everything that we needed. All those extras got saved for any future repairs down the road.
Armed with a trusty measuring tape, measure each bed’s length, width, and height. Take note of any irregularities or variations in size.
Once you have these measurements, it’s time to ponder the spacing between your precious plants. Different plants have different water needs, so it’s crucial to consider their individual requirements when deciding on spacing.
A general rule of thumb is to space emitters about 12 inches apart within a bed; however, this can vary based on plant size and water demands. For larger plants that need more hydration, you might want to decrease the spacing between emitters to ensure even moisture distribution.
Determining the number and placement of emitters per bed
Now that you have your measurements and spacing figured out like a master gardener let’s determine how many emitters each bed requires and where they should be placed for optimal irrigation efficiency. The number of emitters needed depends on various factors such as plant water requirements and soil type.
Calculate each raised bed’s total area (length × width) to estimate emitter quantity accurately. Once you’ve calculated this area for each bed, divide it by the square footage covered by one emitter (refer to manufacturer specifications).
This will give you an approximate count of individual beds. Placement-wise-picture this: emitters should be positioned near the base of each plant, preferably in a circular manner around the root zone.
It may seem like a meticulous process, but precision is key to achieving a beautifully thriving garden with drip irrigation. So measure twice, calculate accurately, and place those emitters like an irrigation Picasso!
We chose six-inch emitter tubing branching off of half an inch main line that had to make a long circuitous route around the back deck to make it to our beds.

Gathering Materials and Tools for Installation
Choosing the right type and size of drip irrigation tubing
When it comes to selecting the perfect drip irrigation tubing, you want something that will withstand the test of time and deliver water efficiently to your plants. There are a few different types of tubing to choose from, but the most common ones are polyethylene (PE) and vinyl. Polyethylene tubing is more durable and resistant to UV rays, making it an excellent choice for long-term use.
On the other hand, vinyl tubing is more affordable and easier to work with if you’re on a tighter budget or have simple watering needs. Another crucial consideration when choosing drip irrigation tubing is its size or diameter.

The diameter directly affects the flow rate of water through the system. A larger diameter, such as 1/2 inch, might be suitable for larger raised beds or plants requiring higher water volumes.
However, for smaller beds or plants with lower water requirements, a 1/4-inch diameter would work just fine. Assess your specific needs before making a decision.
Selecting appropriate emitters based on plant needs
Emitters play a vital role in ensuring each plant receives adequate water directly at its roots. Various types of emitters are available, including drippers, sprayers, and micro-sprinklers.

Drippers release water slowly in droplets directly onto the soil surface near the plant’s base, while sprayers emit a fine mist over a broader area. To determine which emitter type suits your plants best, consider their individual watering requirements.
For example, if you have delicate flowers that prefer gentle hydration without getting their foliage wet, drippers would be an ideal choice. On the other hand, if you have larger vegetable plants that need more widespread watering coverage during hot summer days, micro-sprinklers can save you time by covering more ground.
Acquiring necessary connectors, stakes, and clamps
To ensure a secure and efficient drip irrigation system, you’ll need a few additional components to connect the tubing and support it in place. Connectors are essential for joining different tubing sections together or attaching the mainline to the faucet. They come in various shapes and sizes, such as couplings, tees, and elbows.
Make sure to choose connectors matching your tubing diameter for a snug fit. Stakes or supports are necessary to keep the tubing in place and prevent it from shifting or being damaged by foot traffic or garden tools.
You can find stakes specifically designed for drip irrigation systems that will hold your tubing firmly without causing any damage. Additionally, clamps are handy when securing the emitters onto the distribution tubing, ensuring they stay put while delivering water precisely where you want it.
Gathering all these materials might seem overwhelming at first glance, but having everything prepared will make your installation process much smoother. By selecting the right drip irrigation tubing size and type, suitable emitters for your plant’s needs, and acquiring connectors, stakes, and clamps to keep everything secure in place – you’re setting yourself up for success!
Installing the Drip Irrigation System
Preparing the main water supply line
Now that you have gathered all the necessary materials and tools, it’s time to embark on the journey of installing your drip irrigation system in raised beds. The first step is to prepare your main water supply line. Start by locating a suitable outdoor faucet or water source near your raised beds.
Ensure it has a threaded connection that matches your pressure regulator and filter. You can install a threaded faucet specifically for your irrigation system if needed.
Installing a pressure regulator and filter
A pressure regulator is essential to your drip irrigation system as it helps control the amount of water pressure flowing through the emitters, preventing damage to delicate plants. To install it, connect one end of the regulator to your threaded faucet or water source using a plumber’s tape for a secure seal. (Tip: I use dish soap instead of plumbers tape for outdoor connections — smearing a drop of soap on the threads allows you to get a tight seal with only the pressure from hand tightening. Then when you test the connection, you can use any bubbles that appear as an indication you need to tighten more.)
Next comes installing a filter to remove any debris or sediment from entering your drip system. This ensures that clean water flows through without clogging or damaging emitters.
Connect the filter after the pressure regulator along with appropriate connectors and clamps. Choosing filters with mesh sizes appropriate for your water source quality is important. Drip Depot’s custom DIY drip irrigation kits will simplify this part.
Connecting the mainline to an outdoor faucet or water source
With the pressure regulator and filter securely installed, it’s time to connect your mainline tubing to either an outdoor faucet or a dedicated water source for drip irrigation systems. Ensure all connections are tight and leak-free by using adjustable wrenches if needed. After completing these initial steps, you can lay out distribution tubing along each bed.
Laying out distribution tubing along each bed
Creating an efficient layout for your drip irrigation
To ensure optimal water distribution, creating an efficient layout for the distribution tubing along each bed is important. Start by measuring the length and width of each bed accurately. Cut the distribution tubing according to these measurements, allowing some slack for adjustments during installation.
Positioning the emitters
Now comes the exciting part of positioning the emitters along the distribution tubing to suit your plants’ needs. Since we’re growing vegetables seasonally in these raised beds and alternating between growing from seed and transplants, we needed these emitter tubes to be flexible and adjustable for our custom DIY drip irrigation.
Testing and adjusting the drip irrigation emitters
Once you have laid out all the distribution tubing with emitters in place, turn on your irrigation system temporarily to check for any leaks or issues. Make any necessary adjustments or repairs before burying or covering up the tubing with soil or mulch.

Conclusion: a look back at our custom DIY drip irrigation journey
Installing a drip irrigation system in your raised beds is a rewarding endeavor that can save you time and water while promoting healthier plant growth. By preparing your main water supply line with a pressure regulator and filter, you ensure a smooth water flow through your system while protecting your plants from excessive pressure and debris. Connecting your mainline securely to an outdoor faucet or dedicated water source is crucial for uninterrupted watering sessions.
Laying out distribution tubing along each bed allows you to customize irrigation based on plant requirements, ensuring efficient use of resources. By embracing drip irrigation in raised beds, you are making gardening easier on yourself and contributing positively towards sustainable gardening practices.
The controlled application of water directly to plant roots reduces wastage and promotes deep root growth – resulting in stronger, healthier plants that will thrive throughout their growing season. So go ahead and embark on this irrigation adventure confidently; it’s an investment that will yield fruitful results for you and your beloved plants!
